部署harbor私有仓库
安装下载依赖包
安装docker-compose
从 docker compose 发布页面下载最新的 docker-compose 二进制文件,本文以1.25.4为例
1
2
3
4
5
6
7
cd /opt/k8s/work/harbor/
wget https://github.com/docker/compose/releases/download/1.25.4/docker-compose-Linux-x86_64
mv docker-compose-Linux-x86_64 /opt/k8s/bin/docker-compose
chmod a+x /opt/k8s/bin/docker-compose
export PATH=/opt/k8s/bin:$PATH下载harbor二进制文件
从 harbor 发布页面下载最新的 harbor 离线安装包,本文以v1.9.4为例
1
2
3
4
5
cd /opt/k8s/work/harbor/
wget https://github.com/goharbor/harbor/releases/download/v1.9.4/harbor-offline-installer-v1.9.4.tgz
tar -xzvf harbor-offline-installer-v1.9.4.tgz导入 docker images
导入离线安装包中 harbor 相关的 docker images1
2cd /opt/k8s/work/harbor/harbor
docker load -i harbor.v1.9.4.tar.gz
以http形式启动
修改harbor.yml文件
修改 hostname、data_volume属性值1
2
3
4
5cd /opt/k8s/work/harbor/harbor
cp harbor.yml harbor.yml.bak
vim harbor.yml修改信息如下
1
2
3
4
5
6
7
8
9diff harbor.yml harbor.yml.bak
5c5
< hostname: 192.168.0.107
---
> hostname: reg.mydomain.com
40c40
< data_volume: /data/k8s/harbor/data
---
> data_volume: /data加载和启动 harbor 镜像
1
2
3
4cd /opt/k8s/work/harbor/harbor
mkdir -p /data/k8s/harbor/data
chmod 777 /var/run/docker.sock /data/k8s/harbor/data
./install.sh启动日志
1
2
3
4
5
6
7
8
9
10
11
12
13
14
15
16
17
18
19
20
21
22
23
24
25
26
27
28
29
30
31
32
33
34
35
36
37
38
39
40
41
42
43
44
45
46
47
48
49
50
51
52
53
54
55
56
57
58Note: docker version: 19.03.13
Note: docker-compose version: 1.25.4
# Configuration file of Harbor
[Step 1]: loading Harbor images ...
Loaded image: goharbor/harbor-core:v1.9.4
Loaded image: goharbor/clair-photon:v2.1.0-v1.9.4
Loaded image: goharbor/harbor-portal:v1.9.4
Loaded image: goharbor/nginx-photon:v1.9.4
Loaded image: goharbor/chartmuseum-photon:v0.9.0-v1.9.4
Loaded image: goharbor/prepare:v1.9.4
Loaded image: goharbor/redis-photon:v1.9.4
Loaded image: goharbor/registry-photon:v2.7.1-patch-2819-2553-v1.9.4
Loaded image: goharbor/notary-server-photon:v0.6.1-v1.9.4
Loaded image: goharbor/harbor-log:v1.9.4
Loaded image: goharbor/harbor-db:v1.9.4
Loaded image: goharbor/harbor-jobservice:v1.9.4
Loaded image: goharbor/harbor-registryctl:v1.9.4
Loaded image: goharbor/notary-signer-photon:v0.6.1-v1.9.4
Loaded image: goharbor/harbor-migrator:v1.9.4
[Step 2]: preparing environment ...
prepare base dir is set to /opt/k8s/work/harbor/harbor
Generated configuration file: /config/log/logrotate.conf
Generated configuration file: /config/log/rsyslog_docker.conf
Generated configuration file: /config/nginx/nginx.conf
Generated configuration file: /config/core/env
Generated configuration file: /config/core/app.conf
Generated configuration file: /config/registry/config.yml
Generated configuration file: /config/registryctl/env
Generated configuration file: /config/db/env
Generated configuration file: /config/jobservice/env
Generated configuration file: /config/jobservice/config.yml
Generated and saved secret to file: /secret/keys/secretkey
Generated certificate, key file: /secret/core/private_key.pem, cert file: /secret/registry/root.crt
Generated configuration file: /compose_location/docker-compose.yml
Clean up the input dir
[Step 3]: starting Harbor ...
Creating network "harbor_harbor" with the default driver
Creating harbor-log ... done
Creating harbor-db ... done
Creating redis ... done
Creating harbor-portal ... done
Creating registry ... done
Creating registryctl ... done
Creating harbor-core ... done
Creating harbor-jobservice ... done
Creating nginx ... done
✔ ----Harbor has been installed and started successfully.----
Now you should be able to visit the admin portal at http://192.168.0.107.
For more details, please visit https://github.com/goharbor/harbor .查看启动状态
1
2
3
4
5
6
7
8
9
10
11
12root@master:/opt/k8s/work/harbor/harbor# docker-compose ps
Name Command State Ports
---------------------------------------------------------------------------------------------
harbor-core /harbor/harbor_core Up (healthy)
harbor-db /docker-entrypoint.sh Up (healthy) 5432/tcp
harbor-jobservice /harbor/harbor_jobservice ... Up (healthy)
harbor-log /bin/sh -c /usr/local/bin/ ... Up (healthy) 127.0.0.1:1514->10514/tcp
harbor-portal nginx -g daemon off; Up (healthy) 8080/tcp
nginx nginx -g daemon off; Up (healthy) 0.0.0.0:80->8080/tcp
redis redis-server /etc/redis.conf Up (healthy) 6379/tcp
registry /entrypoint.sh /etc/regist ... Up (healthy) 5000/tcp
registryctl /harbor/start.sh Up (healthy)如果有不是healthy状态的对象,到/var/log/harbor/目录下查看对应对象的日志
harbor官方提供的启动文件中容器的日志类型是syslog,不支持用docker logs查看
1
2ls /var/log/harbor/
core.log jobservice.log portal.log postgresql.log proxy.log redis.log registryctl.log registry.log
浏览器访问 http://192.168.0.107,用账号 admin 和 harbor.yml 配置文件中的默认密码 Harbor12345 登陆系统。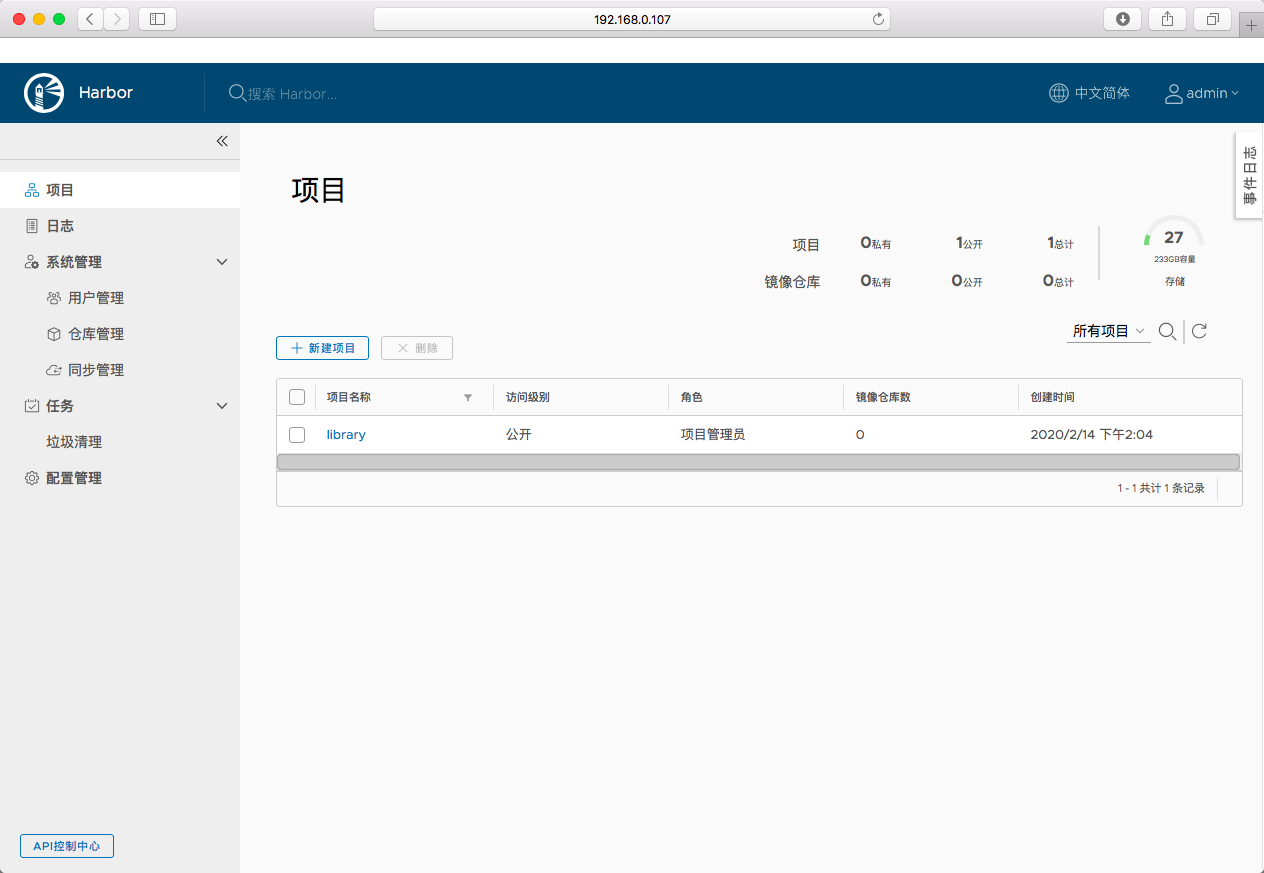
创建一个新的项目
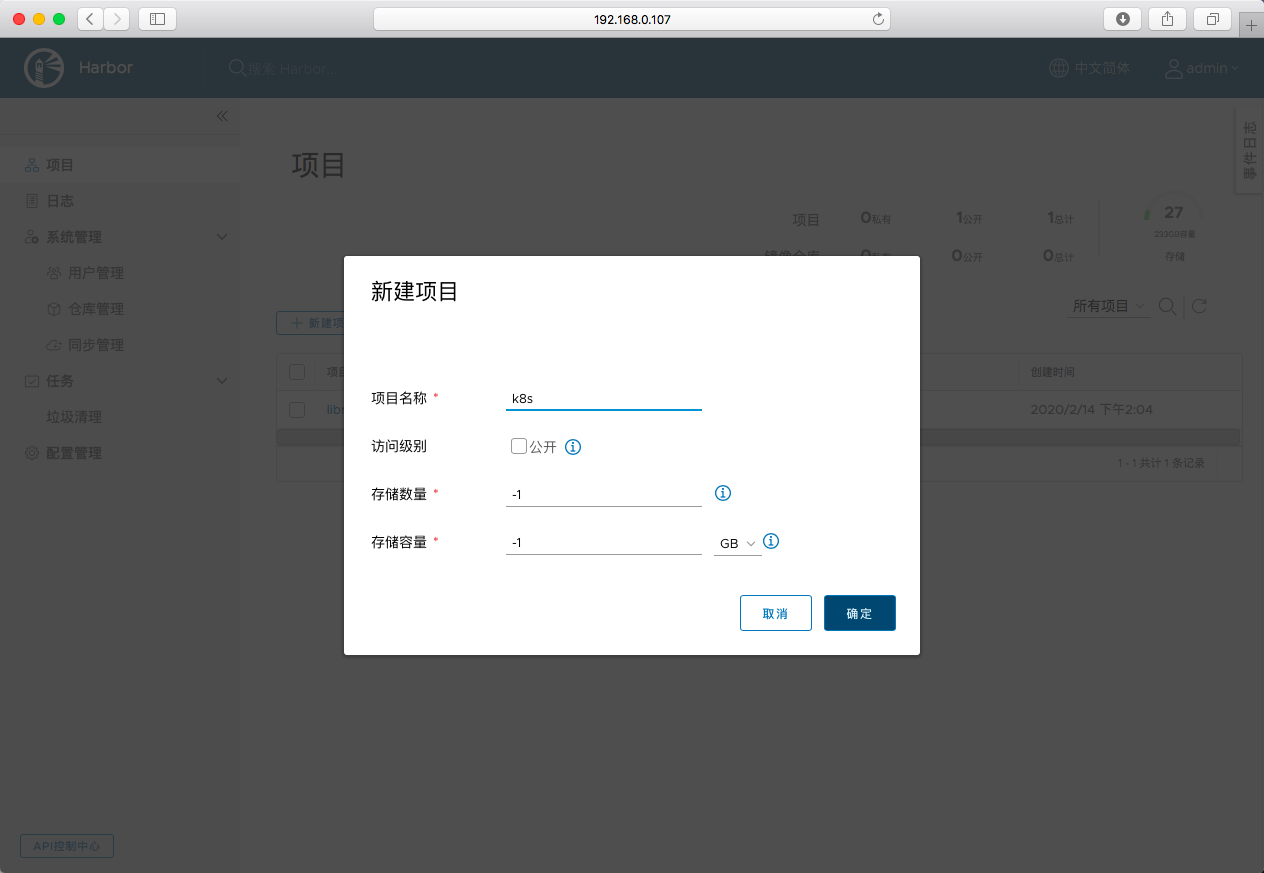
docker命令拉取和上传镜像
执行login
1
2
3root@slave:~# docker login -u admin -p Harbor12345 192.168.0.107
WARNING! Using --password via the CLI is insecure. Use --password-stdin.
Error response from daemon: Get https://192.168.0.107/v2/: dial tcp 192.168.0.107:443: connect: connection refused因为docker命令默认采用https和API交互,而我们的harbor是http的,所以不能执行,需要在/etc/docker/daemon.json中追加insecure-registries配置
1
2
3
4
5
6
7
8
9
10
11
12{
"registry-mirrors": ["https://docker.mirrors.ustc.edu.cn","https://hub-mirror.c.163.com"],
"insecure-registries": ["192.168.0.107"],
"max-concurrent-downloads": 20,
"live-restore": true,
"max-concurrent-uploads": 10,
"data-root": "/data/k8s/docker/data",
"log-opts": {
"max-size": "100m",
"max-file": "5"
}
}重新启动docker服务
1
2
3
4
5
6
7
8
9root@slave:~# systemctl restart docker
root@slave:~# docker login -u admin -p Harbor12345 192.168.0.107
WARNING! Using --password via the CLI is insecure. Use --password-stdin.
WARNING! Your password will be stored unencrypted in /root/.docker/config.json.
Configure a credential helper to remove this warning. See
https://docs.docker.com/engine/reference/commandline/login/#credentials-store
Login Succeeded向harbor中刚创建的私有项目里面上传镜像
1
2
3
4
5root@slave:~# docker tag k8s.gcr.io/pause:3.1 192.168.0.107/k8s/pause:3.1
root@slave:~# docker push 192.168.0.107/k8s/pause:3.1
The push refers to repository [192.168.0.107/k8s/pause]
e17133b79956: Pushed
3.1: digest: sha256:fcaff905397ba63fd376d0c3019f1f1cb6e7506131389edbcb3d22719f1ae54d size: 527浏览器查看
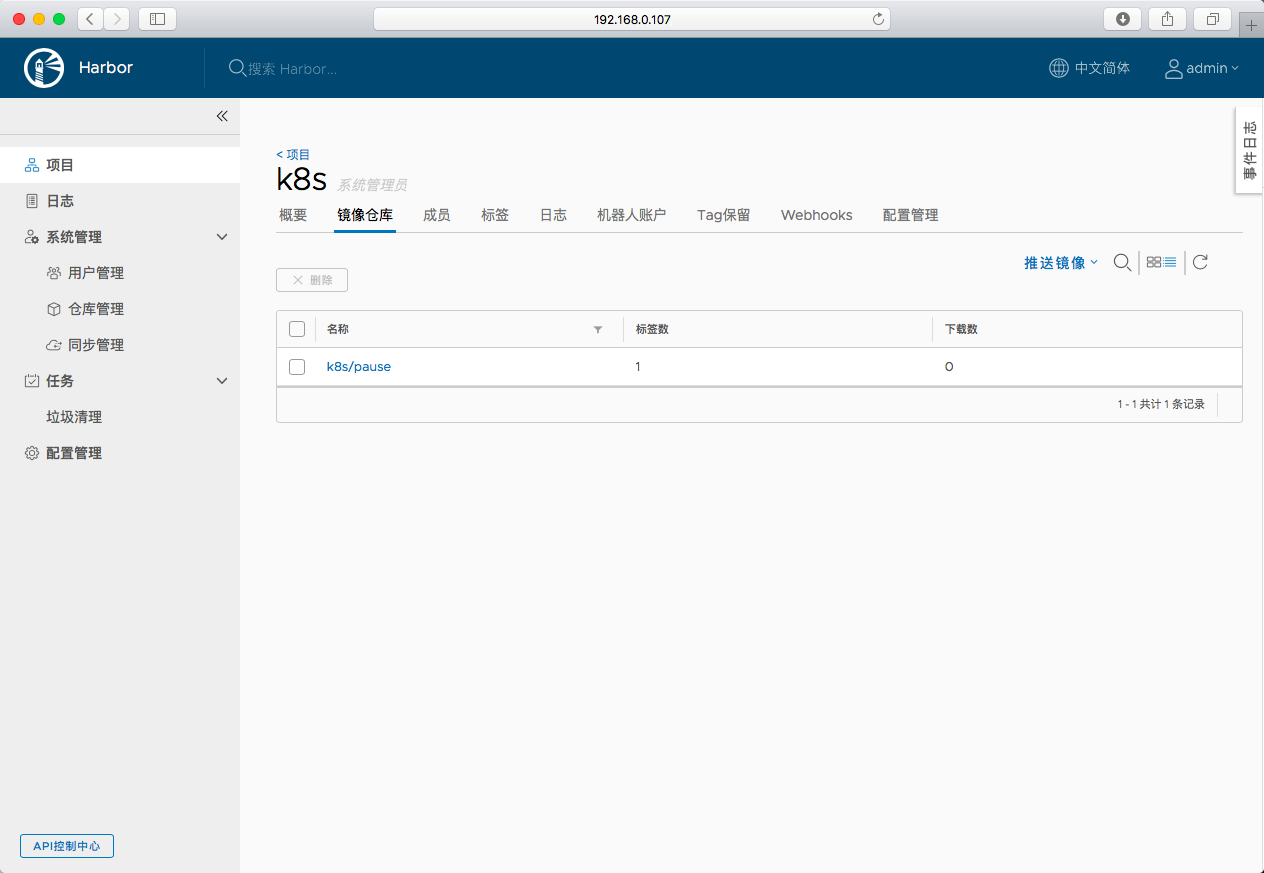
从harbor中下载镜像
1
2
3
4
5
6
7root@slave:~# docker rmi 192.168.0.107/k8s/pause:3.1
Untagged: 192.168.0.107/k8s/pause:3.1
Untagged: 192.168.0.107/k8s/pause@sha256:fcaff905397ba63fd376d0c3019f1f1cb6e7506131389edbcb3d22719f1ae54d
root@slave:~# docker pull 192.168.0.107/k8s/pause:3.1
3.1: Pulling from k8s/pause
Digest: sha256:fcaff905397ba63fd376d0c3019f1f1cb6e7506131389edbcb3d22719f1ae54d
Status: Downloaded newer image for 192.168.0.107/k8s/pause:3.1
以https形式启动
下列操作的工作目录/opt/k8s/work/harbor/harbor是解压harbor离线安装文件后 生成的 harbor 目录
停止harbor(如果没有启动过,则跳过该步骤)
1
2
3
4
5
6
7
8
9
10
11
12
13
14cd /opt/k8s/work/harbor/harbor
root@master:/opt/k8s/work/harbor/harbor# COMPOSE_HTTP_TIMEOUT=200 docker-compose down -v
Stopping nginx ... done
Stopping harbor-jobservice ... done
Stopping harbor-core ... done
Stopping registryctl ... done
Stopping redis ... done
Stopping harbor-portal ... done
Stopping harbor-db ... done
Stopping registry ... done
Stopping harbor-log ... done
Removing harbor-log ... done
Removing network harbor_harbor执行docker-compose down -v后,有可能对应的容器还在,可以执行强制停掉容器
1
docker ps | grep harbor | awk '{print $1}' | xargs -I {} docker rm -f {}
创建 harbor nginx 服务器使用的 x509 证书,本文档采用cfssl工具生成,也可以利用openssl生成,具体步骤参考harbor-openssl
创建harbor用的CA根证书
创建配置文件
1
2
3
4
5
6
7
8
9
10
11
12
13
14
15
16
17
18
19
20
21cd /opt/k8s/work/harbor/
cat > harbor-ca-config.json <<EOF
{
"signing": {
"default": {
"expiry": "87600h"
},
"profiles": {
"harbor": {
"usages": [
"signing",
"key encipherment",
"server auth",
"client auth"
],
"expiry": "87600h"
}
}
}
}
EOF创建证书签名请求文件
1
2
3
4
5
6
7
8
9
10
11
12
13
14
15
16
17
18
19
20
21
22
23cd /opt/k8s/work/harbor/
cat > harbor-ca-csr.json <<EOF
{
"CN": "harbor-ca",
"key": {
"algo": "rsa",
"size": 2048
},
"names": [
{
"C": "CN",
"ST": "NanJing",
"L": "NanJing",
"O": "k8s",
"OU": "system"
}
],
"ca": {
"expiry": "87600h"
}
}
EOF生成自签名的根证书,分发证书
1
2
3
4
5
6
7
8
9cd /opt/k8s/work/harbor/
cfssl gencert -initca harbor-ca-csr.json | cfssljson -bare harbor-ca
ls harbor-ca*pem
mkdir -p /etc/harbor/cert
mv harbor-ca*pem harbor-ca-config.json /etc/harbor/cert
创建harbor用的证书
生成证书请求文件
1
2
3
4
5
6
7
8
9
10
11
12
13
14
15
16
17
18
19
20
21
22
23
24cd /opt/k8s/work/harbor/
cat > harbor-server-csr.json <<EOF
{
"CN": "harbor",
"hosts": [
"127.0.0.1",
"192.168.0.107"
],
"key": {
"algo": "rsa",
"size": 2048
},
"names": [
{
"C": "CN",
"ST": "NanJing",
"L": "NanJing",
"O": "k8s",
"OU": "system"
}
]
}
EOF- hosts 字段指定授权使用该证书的当前部署节点 IP
生成证书
1
2
3
4
5
6cfssl gencert -ca=/etc/harbor/cert/harbor-ca.pem \
-ca-key=/etc/harbor/cert/harbor-ca-key.pem \
-config=/etc/harbor/cert/harbor-ca-config.json \
-profile=harbor harbor-server-csr.json | cfssljson -bare harbor-server
ls harbor-server*pem
mv harbor-server*pem /etc/harbor/cert
编辑配置文件
修改 hostname、data_volume属性值,去除默认的http方式,追加https的配置
1
2
3cd /opt/k8s/work/harbor/harbor
vim harbor.yml修改内容如下
1
2
3
4
5
6
7
8
9
10
11
12
13
14
15
16
17
18
19
20
21
22
23
24
25
26
27
28
29
30
31diff harbor.yml harbor.yml.bak
5c5
< hostname: 192.168.0.107
---
> hostname: reg.mydomain.com
8c8
< #http:
---
> http:
10c10
< # port: 80
---
> port: 80
13c13
< https:
---
> # https:
15c15
< port: 443
---
> # port: 443
17,18c17,18
< certificate: /etc/harbor/cert/harbor-server.pem
< private_key: /etc/harbor/cert/harbor-server-key.pem
---
> # certificate: /your/certificate/path
> # private_key: /your/private/key/path
40c40
< data_volume: /data/k8s/harbor/data
---
> data_volume: /data生成配置文件(如果没有启动过,则跳过该步骤)
1
2
3cd /opt/k8s/work/harbor/harbor
./prepare执行日志
1
2
3
4
5
6
7
8
9
10
11
12
13
14
15
16
17
18
19
20
21
22
23
24
25
26prepare base dir is set to /opt/k8s/work/harbor/harbor
Clearing the configuration file: /config/log/rsyslog_docker.conf
Clearing the configuration file: /config/log/logrotate.conf
Clearing the configuration file: /config/jobservice/config.yml
Clearing the configuration file: /config/jobservice/env
Clearing the configuration file: /config/db/env
Clearing the configuration file: /config/registryctl/config.yml
Clearing the configuration file: /config/registryctl/env
Clearing the configuration file: /config/nginx/nginx.conf
Clearing the configuration file: /config/registry/config.yml
Clearing the configuration file: /config/registry/root.crt
Clearing the configuration file: /config/core/app.conf
Clearing the configuration file: /config/core/env
Generated configuration file: /config/log/logrotate.conf
Generated configuration file: /config/log/rsyslog_docker.conf
Generated configuration file: /config/nginx/nginx.conf
Generated configuration file: /config/core/env
Generated configuration file: /config/core/app.conf
Generated configuration file: /config/registry/config.yml
Generated configuration file: /config/registryctl/env
Generated configuration file: /config/db/env
Generated configuration file: /config/jobservice/env
Generated configuration file: /config/jobservice/config.yml
loaded secret from file: /secret/keys/secretkey
Generated configuration file: /compose_location/docker-compose.yml
Clean up the input dir修改生成文件的访问权限
1
2cd /opt/k8s/work/harbor/harbor
chmod -R 777 common启动harbor
如果是首次启动 执行
1
2
3
4
5cd /opt/k8s/work/harbor/harbor
mkdir -p /data/k8s/harbor/data
chmod 777 /var/run/docker.sock /data/k8s/harbor/data
./install.sh否则执行
1
docker-compose up -d
查看启动状态
1
2
3
4
5
6
7
8
9
10
11
12
13root@master:/opt/k8s/work/harbor/harbor# docker-compose ps
Name Command State Ports
---------------------------------------------------------------------------------------------------------------
harbor-core /harbor/harbor_core Up (healthy)
harbor-db /docker-entrypoint.sh Up (healthy) 5432/tcp
harbor-jobservice /harbor/harbor_jobservice ... Up (healthy)
harbor-log /bin/sh -c /usr/local/bin/ ... Up (healthy) 127.0.0.1:1514->10514/tcp
harbor-portal nginx -g daemon off; Up (healthy) 8080/tcp
nginx nginx -g daemon off; Up (healthy) 0.0.0.0:80->8080/tcp, 0.0.0.0:443->8443/tcp
redis redis-server /etc/redis.conf Up (healthy) 6379/tcp
registry /entrypoint.sh /etc/regist ... Up (healthy) 5000/tcp
registryctl /harbor/start.sh Up (healthy)
- nginx 暴露了两个端口http的80和https的443,使用http访问80会自动重定向到https
浏览器访问 https://192.168.0.107,用账号 admin 和 harbor.yml 配置文件中的默认密码 Harbor12345 登陆系统。
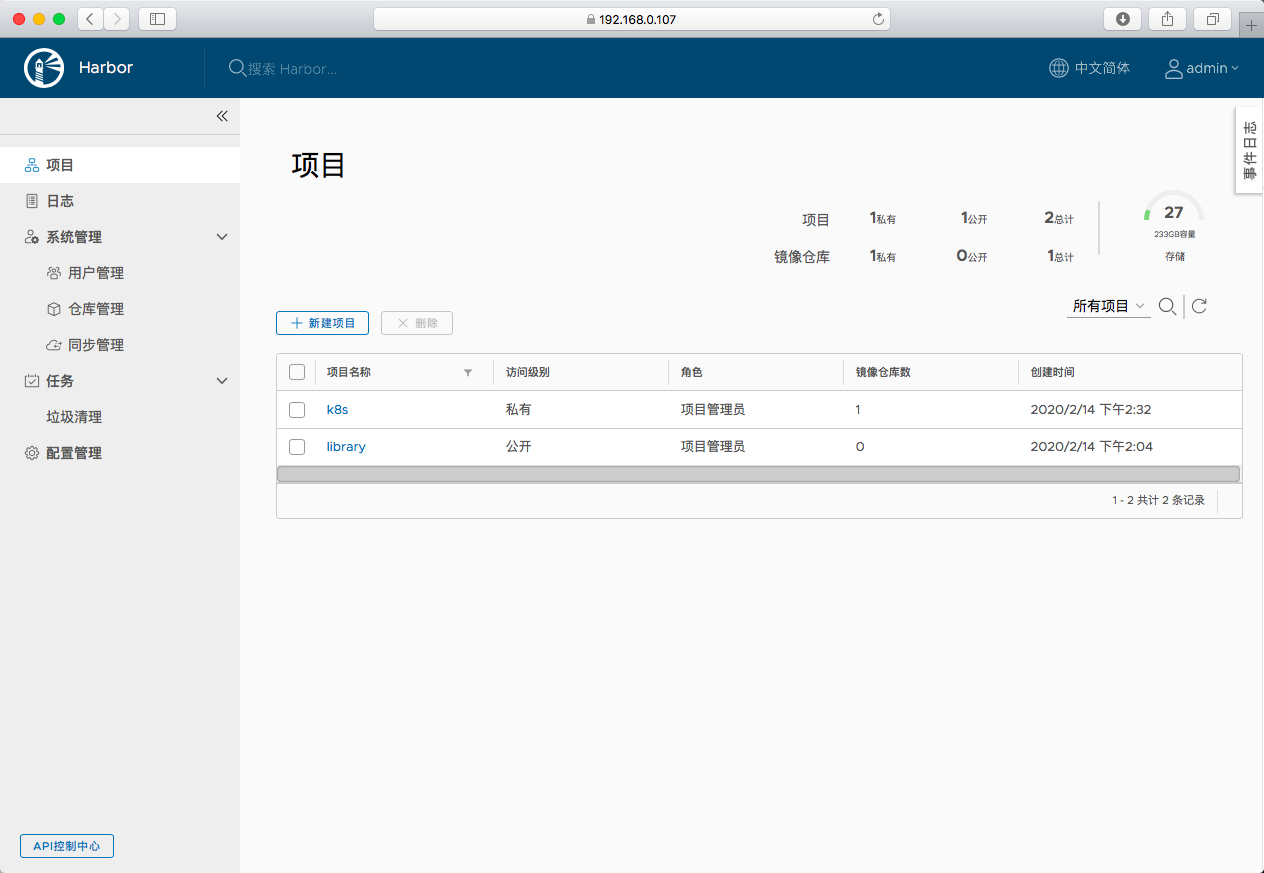
- 其中的k8s是在http模式下创建的项目,直接启动https的可参照上面创建
docker命令拉取和上传镜像
如果之前已经执行过docker login,配置修改后需要重新docker login,需要删除 /root/.docker/config.json文件
如果在/etc/docker/daemon.json中配置过insecure-registries,需要去掉,并重新启动docker服务
执行login
1
2
3root@slave:~# docker login -u admin -p Harbor12345 192.168.0.107
WARNING! Using --password via the CLI is insecure. Use --password-stdin.
Error response from daemon: Get https://192.168.0.107/v2/: x509: certificate signed by unknown authority
错误是说我们用的证书是自签名的证书,签发证书机构未经认证
解决方法是将签署 harbor-server 证书的 CA 证书拷贝到 /etc/docker/certs.d/192.168.0.107 目录下(需要在所有要访问harbor的节点上都执行此操作)
1 | root@slave:~# mkdir -p /etc/docker/certs.d/192.168.0.107 |
重新执行login
1 | root@slave:~# docker login -u admin -p Harbor12345 192.168.0.107 |
上传镜像
1
2
3
4
5
6
7
8
9
10
11
12
13
14root@slave:~# docker images
REPOSITORY TAG IMAGE ID CREATED SIZE
kubernetesui/metrics-scraper v1.0.3 3327f0dbcb4a 2 weeks ago 40.1MB
busybox latest 6d5fcfe5ff17 7 weeks ago 1.22MB
coredns/coredns 1.6.6 cc4d8e8c6169 2 months ago 40.8MB
k8s.gcr.io/pause 3.1 da86e6ba6ca1 2 years ago 742kB
192.168.0.107/k8s/pause 3.1 da86e6ba6ca1 2 years ago 742kB
kubeimage/pause 3.1 da86e6ba6ca1 2 years ago 742kB
nginx 1.9.1 94ec7e53edfc 4 years ago 133MB
root@slave:~# docker tag busybox:latest 192.168.0.107/k8s/busybox:latest
root@slave:~# docker push 192.168.0.107/k8s/busybox:latest
The push refers to repository [192.168.0.107/k8s/busybox]
195be5f8be1d: Pushed
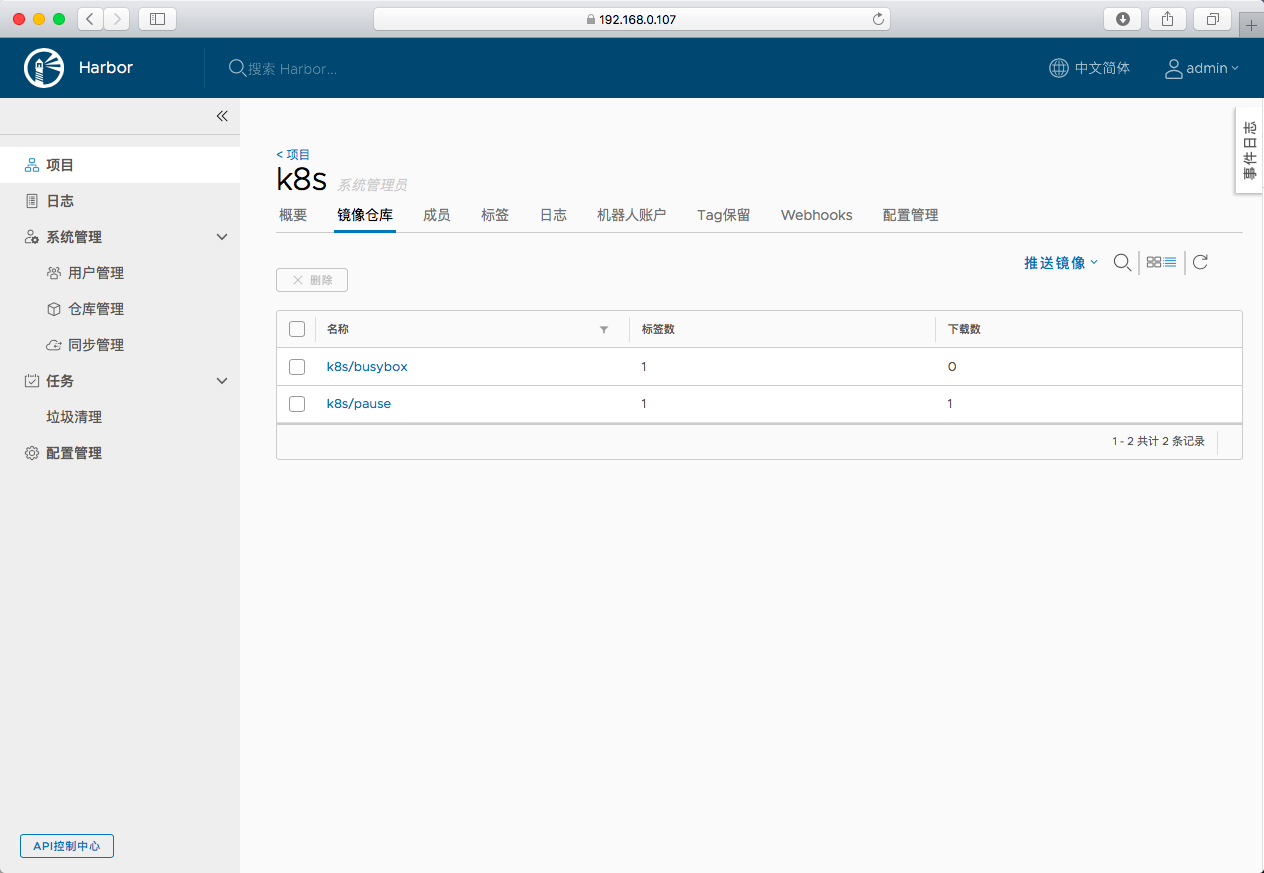
latest: digest: sha256:edafc0a0fb057813850d1ba44014914ca02d671ae247107ca70c94db686e7de6 size: 527通过浏览器查看刚上传的镜像
从harbor下载镜像
1
2
3
4
5
6
7root@slave:~# docker rmi 192.168.0.107/k8s/busybox:latest
Untagged: 192.168.0.107/k8s/busybox:latest
Untagged: 192.168.0.107/k8s/busybox@sha256:edafc0a0fb057813850d1ba44014914ca02d671ae247107ca70c94db686e7de6
root@slave:~# docker pull 192.168.0.107/k8s/busybox:latest
latest: Pulling from k8s/busybox
Digest: sha256:edafc0a0fb057813850d1ba44014914ca02d671ae247107ca70c94db686e7de6
Status: Downloaded newer image for 192.168.0.107/k8s/busybox:latest
kubernetes集群中使用私有的harbor镜像仓库
kubelet配置
kubernetes以pod为管理单元,而不是docker容器,在创建pod时,会先启动一个名为k8s.gcr.io/pause:3.1的镜像。
该镜像存在于google的镜像仓库中,国内不能直接访问,需要翻墙下载,如果集群新加节点,或者节点上这个镜像被清理掉,将导致pod不能启动
一般做法是搭建私有镜像仓库,把这个镜像push到我们的私有镜像仓库,再配置kubelet使用我们私有仓库中的pause镜像
具体做法是修改kubelet服务的启动文件:/etc/systemd/system/kubelet.service,在其中追加–pod-infra-container-image属性,属性值指向自己私有仓库中的pause镜像
例如
1
--pod-infra-container-image=192.168.0.107/k8s/pause:3.1
重启kubelet服务
1
systemctl restart kubelet
kubernetes和harbor进行认证
kubernetes提供了各种方式来访问各种镜像仓库,具体参考Using a Private Registry,本文采用配置节点的方式来使用私有仓库
在集群的任意一个节点上登陆harbor
1
2
3
4
5
6
7root@slave:~# docker login -u admin -p Harbor12345 192.168.0.107
WARNING! Using --password via the CLI is insecure. Use --password-stdin.
WARNING! Your password will be stored unencrypted in /root/.docker/config.json.
Configure a credential helper to remove this warning. See
https://docs.docker.com/engine/reference/commandline/login/#credentials-store
Login Succeeded成功后会生成认证文件/root/.docker/config.json
1
2
3
4
5
6
7
8
9
10
11
12
13root@slave:~# ls /root/.docker/
config.json
root@slave:~# cat /root/.docker/config.json
{
"auths": {
"192.168.0.107": {
"auth": "YWRtaW46SGFyYm9yMTIzNDU="
}
},
"HttpHeaders": {
"User-Agent": "Docker-Client/18.09.6 (linux)"
}
}配置kubelet使用此认证文件
默认情况下,kubelet会从如下路径中查找私有仓库的认证文件
- {–root-dir:-/var/lib/kubelet}/config.json
- {cwd of kubelet}/config.json
- ${HOME}/.docker/config.json #须在环境变量文件中为 kubelet 显式设置 HOME=/root
- /.docker/config.json
此处我们将私有仓库的认证文件copy到kubelet的root目录下,此目录在kubelet.service中进行设置
例如1
--root-dir=/data/k8s/k8s/kubelet
copy私有仓库的认证文件到kubelet的root目录(所有运行kubelet,需要访问harbor的节点都需要),本环境中有两个节点
1
2
3cp /root/.docker/config.json /data/k8s/k8s/kubelet/config.json
scp /root/.docker/config.json root@192.168.0.114:/data/k8s/k8s/kubelet/config.json
验证
创建一个pod,image 指定私有仓库里面的镜像
1
2
3
4
5
6
7
8
9
10
11
12
13
14
15cd /opt/k8s/yml
cat > private-busybox.yml << EOF
apiVersion: v1
kind: Pod
metadata:
name: private-busybox
spec:
containers:
- name: private-busybox
image: 192.168.0.107/k8s/busybox:latest
command:
- sleep
- "3600"
EOF创建pod
1
root@master:/opt/k8s/yml# kubectl create -f private-busybox.yml
查看运行状态
1
2root@master:/opt/k8s/yml# kubectl get pod | grep private-busybox
private-busybox 1/1 Running 0 108s通过docker命令,查看启动pod对应的容器的镜像名称
1
2
3
4root@master:/opt/k8s/yml# docker ps | grep -e IMAGE -e private-busybox
CONTAINER ID IMAGE COMMAND CREATED STATUS PORTS NAMES
c2b43d9d9b3e 192.168.0.107/k8s/busybox "sleep 3600" About a minute ago Up About a minute k8s_private-busybox_private-busybox_default_98a4d4bd-fd46-4d9d-8ef9-95845ce7e53d_0
a4a84461d5fe 192.168.0.107/k8s/pause:3.1 "/pause" About a minute ago Up About a minute k8s_POD_private-busybox_default_98a4d4bd-fd46-4d9d-8ef9-95845ce7e53d_0 1/1 Running 0 5s可以看到启动的容器对应的镜像都是我们自己的私有仓库中的镜像
原文链接: